Creating Kanzi Studio window plugins
Kanzi Studio plugins extend the functionality of Kanzi Studio and run in Kanzi Studio. Use a Kanzi Studio plugin to:
- Automate tasks in Kanzi Studio. For example, to automate tasks that take a lot of time when you do them manually, or the task is prone to errors.
- Import and export content from Kanzi Studio. For example, to import or export localization tables in a format not supported by Kanzi Studio.
- Create editors that abstract the details and speed up the workflow. For example, to visualize the connections between nodes and resources used in your Kanzi Studio project.
You can present a Kanzi Studio plugin either:
- In a Kanzi Studio window that contains the plugin user interface.
- As commands that users can execute from the Kanzi Studio main menu or from a context menu, running the plugin without a user interface.
This topic covers how to create Kanzi Studio window plugins. To learn how to create Kanzi Studio command plugins, see Creating Kanzi Studio command plugins.
The default UI framework for creating Kanzi Studio window plugins is WPF. However, you can use frameworks that run on HTML using the web browser control in WPF, or other frameworks by embedding the content using WPF HwndHost control that hosts a win32 window as an element in WPF content.
The Kanzi Studio plugin interface is provided as a .NET framework assembly. You can find it in <KanziInstallation>/Studio/Bin/PluginInterface.dll. The plugin interface provides access to data and commands in Kanzi Studio. When you want to use a Kanzi Studio plugin with different versions of Kanzi Studio, build the plugin with the PluginInterface.dll from each version of Kanzi Studio where you want to use that plugin.
To develop a Kanzi Studio window plugin:
- Create the base for a Kanzi Studio window plugin. See Creating the base for a Kanzi Studio window plugin.
- Build and run your Kanzi Studio plugin. See Building and running a Kanzi Studio plugin.
- Add functionality to your Kanzi Studio plugin. See Adding functionality to your Kanzi Studio window plugin.
- Group project changes in your Kanzi Studio window plugin for undo and redo. See Grouping project changes in your Kanzi Studio window plugin.
- Debug your Kanzi Studio plugin. See Debugging a Kanzi Studio plugin.
To find detailed information about the Kanzi Studio plugin interface see:
Creating the base for a Kanzi Studio window plugin
Kanzi Studio window plugins are plugins that you use in a Kanzi Studio window and have a user interface. For example, use the window plugins to create an editor or to visualize the content in your project.
Here you create the base for a Kanzi Studio window plugin where you then add functionality that extends the functionality of Kanzi Studio.
To create a Kanzi Studio window plugin:
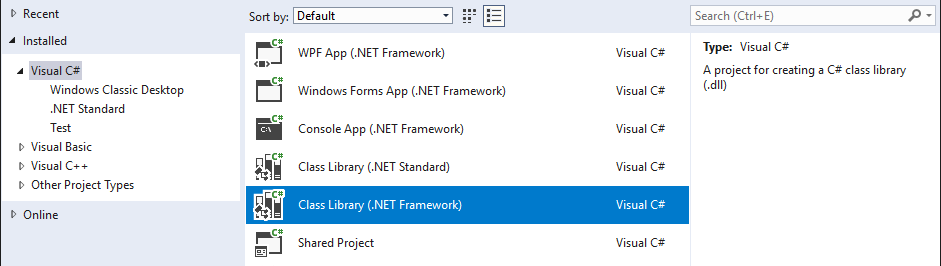
- In Visual Studio select File > New > Project and create a Visual C# Class Library.
- In the Solution Explorer right-click the project name, select Add > Reference, and add references to files:
- Select Assemblies > Framework targeting .NET Framework and add the reference to:
System.ComponentModel.CompositionSystem.XAML
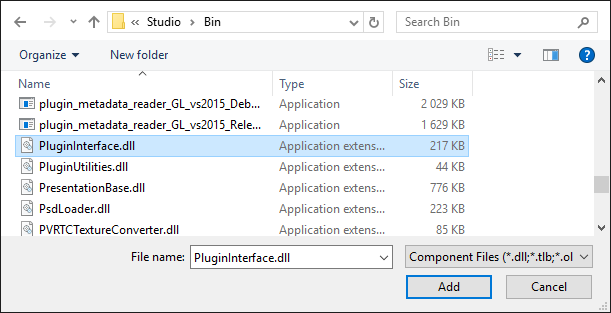
- Click Browse... and add the reference to the <KanziInstallation>/Studio/Bin/PluginInterface.dll file.
-
In the Solution Explorer right-click the project name, select Properties, and:
- In the Application tab set the Target framework to .NET Framework 4.7.1.

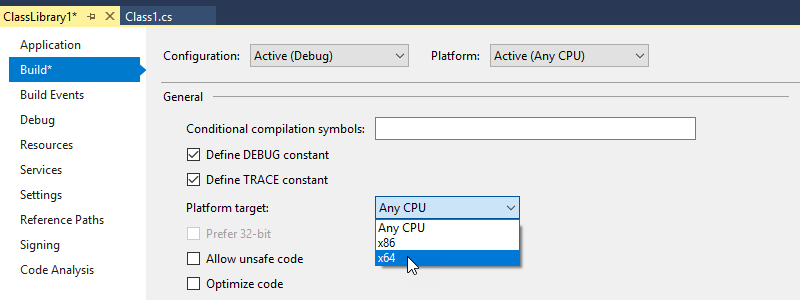
- In the Build tab set the Platform target to x64.
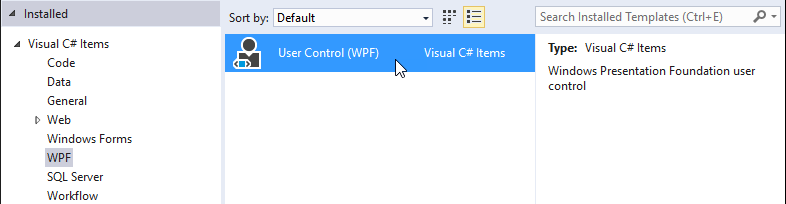
- In the Solution Explorer right-click the project name, select Add > User Control and add a User Control (WPF) item.
- Open the
UserControl1.xaml.cs file and add the using directive for the Kanzi Studio plugin interface:
using Rightware.Kanzi.Studio.PluginInterface;
- Set the
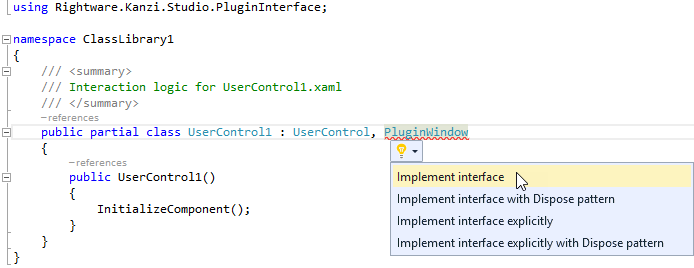
UserControl1 class to implement the PluginWindow interface:- Change
public partial class UserControl1 : UserControl
topublic partial class UserControl1 : UserControl, PluginWindow
- Implement the
PluginWindow interface.
For example, hover over PluginWindow, click  , and select Implement Interface.
- Add the
KanziStudio interface to the UserControl1 class. KanziStudio interface is the entry point for operating with the Kanzi Studio plugin API.
private KanziStudio studio;
-
In all functions replace this line with the code you want to execute:
throw new NotImplementedException();
Make sure that your plugin handles all its internal exceptions and does not let them reach the Kanzi Studio interface.
For example, set the functions in the UserControl1 class:- Add to
UserControl1 the studio parameter. This enables you to instantiate the UserControl1 and supply studio as an argument in the Class1.cs file.
public UserControl1(KanziStudio studio)
{
    this.studio = studio;
    InitializeComponent();
} - Use the
Icon function to set the plugin window icon shown in the top-left corner of the plugin window:- Return an empty string to use the Kanzi Studio default plugin icon.
public string Icon
{
    get
    {
        return "";
    }
} - Use the
SerializeState function to save the state of the plugin window. Kanzi Studio calls this function when you close the plugin window. When you open the plugin window again, Kanzi Studio passes the same state as a parameter as it creates the plugin window.
When set to null, Kanzi Studio does not remember the state of the window.
public PluginWindowState SerializeState()
{
    return null;
} - Use the
Title function to set the text you want to show as the title of the plugin window. For example, set it to:
public string Title
{
    get
    {
        return "Plugin title";
    }
} - Use the
Dispose function to clean up when closing the plugin window. For example, here you can release all resources you use in the plugin, and if your plugin subscribes to any events, unsubscribe these events here. Kanzi Studio calls this function when user closes a plugin window.
Since in this example there is nothing to clean up, you can leave this function empty.
-
Open the
Class1.cs file and add the using directive for the System.ComponentModel.Composition and the Kanzi Studio plugin interface:
using System.ComponentModel.Composition;
using Rightware.Kanzi.Studio.PluginInterface;
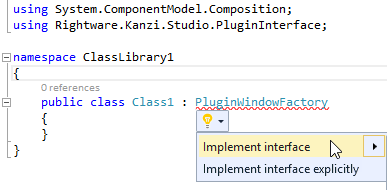
- Set the
Class1 class to implement the PluginWindowFactory interface, which you implement in the Class1 class. Kanzi uses this class to create the plugin. Kanzi Studio first gets the factory and defines the name of the plugin, the size of the window, if the plugin has a window, and from where in Kanzi Studio users can launch the plugin.- Change
public class Class1
topublic class Class1 : PluginWindowFactory
- Implement the
PluginWindowFactory interface.
For example, hover over PluginWindowFactory, click , and select Implement Interface.
- Before the definition of the class where you create the plugin, mark the factory class which implements the
PluginWindowFactory interface to be the plugin content for Kanzi Studio. This way Kanzi Studio knows that the .dll is a plugin.
[Export(typeof(PluginContent))]
-
In all functions replace this line with the code you want to execute:
throw new NotImplementedException();
Make sure that your plugin handles all its internal exceptions and does not let them reach the Kanzi Studio interface.
For example, set the functions in the Class1 class to:- Use the
CreateWindow function to instantiate the UserControl1 and supply studio as an argument. You added the studio parameter to the UserControl1 in the UserControl1.xaml.cs file.
public PluginWindow CreateWindow(PluginWindowState state)
{
    return new UserControl1(studio);
} - Use the
DefaultHeight and DefaultWidth functions to the height and width of the window of your plugin. For example, to make a 400 by 400 pixel plugin window use:
get
{
    return 400;
} -
Use the
CanExecute function to set whether users can launch your plugin, and where they can launch your plugin:
- When set to
false, Kanzi Studio shows the plugin in the main menu and the context menu, but users cannot launch the plugin. - When set to
true, users can launch the plugin.
Kanzi Studio provides the KanziStudio object to plugins. The KanziStudio object is the root object for data access and provides the current project, available commands, global undo and redo, and events related to project opening and closing.
For example, use this to enable the command only when a Kanzi Studio project is open
private KanziStudio studio;
public bool CanExecute(PluginCommandParameter parameter)
{
    return this.studio != null && this.studio.ActiveProject != null;
} -
Use the
CommandPlacement function to set the menu name of the plugin, and where you want to show the command to launch the plugin:
- To show the plugin in the main menu use
ContextMenuPlacement.NONE. - To show the plugin in the context menus invoked from nodes and resources, and the main menu use
ContextMenuPlacement.PROJECT_ITEM.
public CommandPlacement CommandPlacement
{
    get
    {
        return new CommandPlacement("myPluginMenu", ContextMenuPlacement.NONE, false, null);
    }
} -
Use the
Description function to set a brief description of what your Kanzi Studio plugin does. Kanzi Studio shows this description as a tooltip when a user hovers the mouse pointer over the plugin name in the menu.
public string Description
{
    get
    {
        return "A tooltip with short description of what the plugin does.";
    }
} -
Use the
DisplayName function to show the plugin name in the Kanzi Studio menu where you can launch the plugin.
public string DisplayName
{
    get
    {
        return "Plugin display name";
    }
} -
Use the
Name function to set the internal name of your plugin. Kanzi uses the internal name of the plugin so that you can change the display name of your plugin without additional changes to the plugin.
public string Name
{
    get
    {
        return "Internal plugin name";
    }
} -
Use the
Initialize function to place studio to a member variable.
public void Initialize(KanziStudio studio)
{
    this.studio = studio;
}
- Build and run the plugin. See Building and running a Kanzi Studio plugin.
Here you created just the base structure for your Kanzi Studio window plugin, which only opens an empty window. To make your plugin do more than that, add functionality to the window. See Adding functionality to your Kanzi Studio window plugin and Grouping project changes in your Kanzi Studio window plugin.
To further develop your Kanzi Studio plugin, see Overview of Kanzi Studio plugin interface and Kanzi Studio plugin interface API reference.
Building and running a Kanzi Studio plugin
To build and run a Kanzi Studio plugin:
- In Visual Studio select Build > Build Solution to build the plugin .dll.

-
Copy the Kanzi Studio plugin .dll to the %ProgramData%\Rightware\<KanziVersion>\plugins directory.
If the plugins directory does not exist in %ProgramData%\Rightware\<KanziVersion>, create it.
- Open Kanzi Studio.
Kanzi Studio loads the plugins and adds them to either the main menu or the context menus invoked from nodes and resources.
- In Kanzi Studio select the plugin main menu and select the plugin, or right-click a node in the Project and select the name of your plugin to run your plugin.
Adding functionality to your Kanzi Studio window plugin
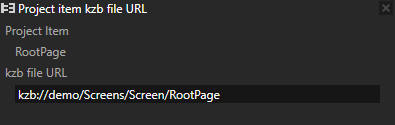
After you create the base for a Kanzi Studio window plugin, add functionality to your plugin so that it does something useful. Here you create a plugin that shows the kzb file URL of the currently selected node or resource.
To add functionality to your Kanzi Studio window plugin:
- Create the base for your Kanzi Studio window plugin. See Creating the base for a Kanzi Studio window plugin.
- In Visual Studio open the Visual Studio solution of your plugin and open the class file that implements the
PluginWindow interface.
For example, open the UserControl1.xaml.cs class file.
- In the class that implements the
PluginWindow interface add the code that your plugin executes when you interact with the plugin in the plugin window.
For example, to create a plugin that shows the kzb file URL of the currently selected project item use:
    public partial class UserControl1 : UserControl, PluginWindow
    {
        private KanziStudio studio;

        public UserControl1(KanziStudio studio)
        {
            this.studio = studio;
            InitializeComponent();
            // Subscribe to the SelectionChanged event to find out when the selection of a node or a resource changes.
            studio.SelectionChanged += Studio_SelectionChanged;
            // Set the contents of the plugin window.
            Populate();
        }

        // When the currently selected project item changes, set the contents of the plugin window.
        private void Studio_SelectionChanged(object sender, EventArgs e)
        {
            Populate();
        }

        // Set the text in the controls that show the name and kzb file URL of the currently selected project item.
        public void Populate()
        {
            var currentSelection = studio.SelectedItems.FirstOrDefault();
            this.selectionTextBlock.Text = (currentSelection != null) ? currentSelection.Name : "< no project item selected >";
            this.kzbUrlTextBox.Text = (currentSelection != null) ? currentSelection.KzbUrl : " ";
        }

        ...

        // Set the title of the plugin window.
        public string Title
        {
            get
            {
                return "Project item kzb file URL";
            }
        }

        ...

        // Dispose of the resources used by the window.
        public void Dispose()
        {
            if (studio != null)
            {
                this.studio.SelectionChanged -= Studio_SelectionChanged;
            }
        }

        ...

    }
- In Visual Studio open the XAML file that implements the layout of the window plugin and add the content you want to show in the window.
For example, open the UserControl1.xaml file and replace <Grid>
</Grid>with <StackPanel Margin="5">
<Label Content="Project Item" />
<TextBlock x:Name="selectionTextBlock" Margin="10,5" />
<Label Content="kzb file URL" />
<TextBox x:Name="kzbUrlTextBox" Margin="10,5" IsReadOnly="True" />
</StackPanel>
- Build and run the plugin. See Building and running a Kanzi Studio plugin.
- Select in the Project a node or in the Library a resource. The plugin window shows the kzb URL for the selected project item.
Grouping project changes in your Kanzi Studio window plugin
Group project changes in your Kanzi Studio window plugin to make the changes appear as one command to the Kanzi Studio user. This way you set undo and redo commands to affect the whole group of changes instead of individual changes.
For example, group project changes when your Kanzi Studio window plugin applies a series of modifications to the project when the user clicks a button, and you want Kanzi Studio to undo all those modifications at once when the user selects > Undo.
Use batch modification to group a series of changes your Kanzi Studio window plugin applies to the project. When you use batch modification, the object which listens to the modified events can skip the events which happen during the batch modification and apply all the changes when the batch modification finishes.
To group project changes in your Kanzi Studio window plugin:
- Create the base for your Kanzi Studio window plugin. See Creating the base for a Kanzi Studio window plugin.
- In Visual Studio open the Visual Studio solution of your plugin and open the class file that implements the
PluginWindow interface.
For example, open the UserControl1.xaml.cs class file.
- In the class that implements the
PluginWindow interface add the code that your plugin executes when you interact with the plugin in the plugin window.
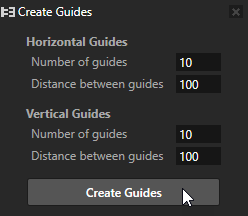
For example, to create a plugin that creates a grid of horizontal and vertical guides: // This function returns true if a guide with a given name already exists.
private bool GuideExists(string guideName)
{
bool exists = false;
var guides = studio.ActiveProject.Guides;
foreach (var guide in guides)
{
var name = guide.Get(Properties.Name);
if (name == guideName)
{
exists = true;
}
}
return exists;
}
// This function creates the guides.
private void CreateGuides(int step, int count, bool isVertical)
{
var guides = studio.ActiveProject.Guides;
for (int i = 1; i <= count; i++)
{
String guideName;
Vector guidePosition;
var coordinate = i * step;
// Set guide position and name.
if (isVertical)
{
guidePosition = new Vector(coordinate, 0);
guideName = "Guide_V" + Convert.ToString(coordinate);
}
else
{
guidePosition = new Vector(0, coordinate);
guideName = "Guide_H" + Convert.ToString(coordinate);
}
// Check if a guide with the same name already exists
bool exists = GuideExists(guideName);
if (!exists)
{
// Create a new guide.
var guide = studio.ActiveProject.CreateProjectItem<Guide>(guideName, null);
// Set the position of the guide.
guide.Set(Properties.GuidePosition, guidePosition);
// For vertical guides, set the Rotation property.
if (isVertical)
{
guide.Set(Properties.GuideRotation, (float)Math.PI/2);
}
}
}
}
- Add the code to call the function you created in the previous step and enclose it between
BeginBatchModification and CommitBatchModification functions.
For example, to create a set of horizontal and vertical guides when the user clicks a button use: private void Button_Click(object sender, RoutedEventArgs e)
{
// Distance between horizontal guides
var horizontalStep = Convert.ToUInt16(hStepInput.Text);
// Number of horizontal guides
int horizontalCount = Convert.ToUInt16(hCountInput.Text);
// Distance between vertical guides
var verticalStep = Convert.ToUInt16(vStepInput.Text);
// Number of vertical guides
int verticalCount = Convert.ToUInt16(vCountInput.Text);
// Begin a batch modification named Create Guides
studio.ActiveProject.BeginBatchModification("Create Guides");
// Call the functions for the code you want to execute inside the batch.
CreateGuides(horizontalStep, horizontalCount, false);
CreateGuides(verticalStep, verticalCount, true);
// Finish the batch modification
studio.ActiveProject.CommitBatchModification();
}
- In Visual Studio open the XAML file that implements the layout of the window plugin and add the content and controls you want to show in the window.
For example, open the UserControl1.xaml file and replace <Grid>
</Grid>with <StackPanel HorizontalAlignment="Center">
<Grid Margin="0,10">
<Grid.ColumnDefinitions>
<ColumnDefinition Width="150" />
<ColumnDefinition Width="45" />
</Grid.ColumnDefinitions>
<Grid.RowDefinitions>
<RowDefinition />
<RowDefinition />
<RowDefinition />
<RowDefinition />
<RowDefinition />
<RowDefinition />
</Grid.RowDefinitions>
<Label Margin="0,0,0,2" Grid.Column="0" Grid.Row="0" FontWeight="Bold">Horizontal Guides</Label>
<Label Margin="5,2,0,2" Grid.Column="0" Grid.Row="1">Number of guides</Label>
<TextBox Margin="0,2" Grid.Column="1" Grid.Row="1" Name="hCountInput" Text="10" />
<Label Margin="5,2,0,2" Grid.Column="0" Grid.Row="2">Distance between guides</Label>
<TextBox Margin="0,2" Grid.Column="1" Grid.Row="2" Name="hStepInput" Text="100" />
<Label Margin="0,10,0,2" Grid.Column="0" Grid.Row="3" FontWeight="Bold">Vertical Guides</Label>
<Label Margin="5,2,0,2" Grid.Column="0" Grid.Row="4">Number of guides</Label>
<TextBox Margin="0,2" Grid.Column="1" Grid.Row="4" Name="vCountInput" Text="10" />
<Label Margin="5,2,2,2" Grid.Column="0" Grid.Row="5">Distance between guides</Label>
<TextBox Margin="0,2" Grid.Column="1" Grid.Row="5" Name="vStepInput" Text="100" />
</Grid>
<Button Padding="5,3" Content="Create Guides" Click="Button_Click" />
</StackPanel>
- Build and run the plugin. See Building and running a Kanzi Studio plugin.
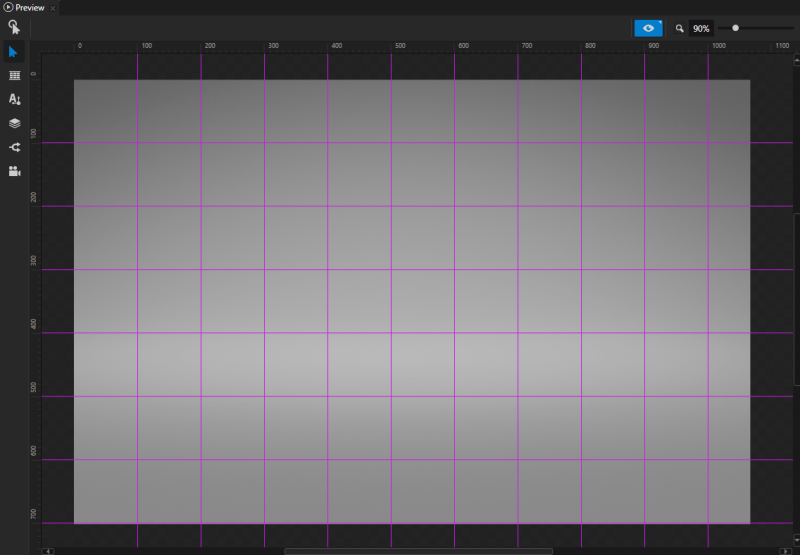
- In your plugin window set the properties which determine the number of and distance between the horizontal and vertical guides you want to create and click the Create Guides button.
Kanzi Studio creates in the Preview window the horizontal and vertical guides.
TIPTo see the guides in you Kanzi Studio project, in the Preview click  to enter the Analyze mode, right-click
  , and select Rulers and guides.
- To check that your batch modification works, use the Kanzi Studio Command History. See Using the Kanzi Studio Command History.
See also
Overview of Kanzi Studio plugin interface
Kanzi Studio plugin interface API reference
Installing Kanzi Studio plugins
Creating Kanzi Studio command plugins
Kanzi Studio plugins
Debugging Kanzi Studio plugins

Open topic with navigation